TDIing out loud, ok SDIing as well

Ramblings on the paradigm-shift that is TDI.

Thursday, November 17, 2016

JSON and XML Tutorial - Part 5, Scripting a Connector

Continuing from my last rambling post, we'll script an Iterator Connector that will return the same parsed entries as our Conditional Loop did. I'll begin with a little theory, which you will find duplicated other places like the How-To page of www.tdi-users.org and this venerable video tutorial on the subject.

To script a component in TDI (SDI) you start with the basic Script version of that component. So in order to script a Connector, you add a Script Connector.

Typing 'script' in the Search box filter the selection list. Since we'll be implementing only Iterator mode, we may as well choose this mode in the wizard.
Our new Connector looks pretty much like any other Connector at this point. All the features provided by the TDI AL framework are visible in the various tabs: Input/Output Map, Hooks, Delta, Connection Errors and Pool. You can also choose the Mode and State for your Connector, as well as when the component will initialize. Only the Connection tab is specific to the technology our Connector is interfacing with. That is why this aspect is called the Connector Interface, or CI for short.

The Connection tab of our Script Connector does not hold the usual set of parameter (yet), but instead gives us access to the interface logic of the component via the Edit Script... button.
Press this button to open the script editor.

Once in the editor, we can see that our new Connector has a preloaded example script. At the top are the two functions necessary for Iterator mode: selectEntries() and getNextEntry().
This is how a scripted component works: if the required functions are present in the script, then that operation or mode is available. Note however that for a scripted Connector, the Mode drop-down will always contain all modes - including those not supported by its script.

Iterator mode selects its data set with selectEntries() and then iterates through it using getNextEntry() to return one Entry at a time and to signal End-of-data when the data set is exhausted. Here is the standard template for these function with a little comment added for clarity:

var counter = 0;

function selectEntries()
{
// initialize the 'data set'
counter = 0;
}

function getNextEntry ()
{
// if the data set is exhausted, setStatus to 0
if (counter > 100) {
result.setStatus (0);
        // This next line is no longer required after TDI 7.1
result.setMessage ("End of input");
return;
}

// otherwise, populate the conn Entry via the 'entry' variable
entry.setAttribute ("counter", counter);
counter++;
// setStatus is 1 by default, which means 'more data available'
}

A scripted Iterator is easy to test in the Schema section of the Connector's Input or Output Map. Pressing the Connect button calls the initialize() function (if one exists), followed by querySchema()and then selectEntries()

The reason information shows up under Schema when you press the Connect button is because there is a template script for querySchema(). Here is a copy of it with clarifying comments:

function querySchema ()
{
// the 'list' variable is a Java Vector for returning 
// one or more schema items. Each one is added to the
// Vector as an Entry with two attributes:
//    name - the name of the attribute
//    syntax - a string value with guidance to the developer
var e = new com.ibm.di.entry.Entry();
e.addAttributeValue("name","counter");
e.addAttributeValue("syntax","Number");
list.add(e);
// once again, setStatus to 1 means info available
result.setStatus (1);
}

If there is no querySchema() function then the Schema grid is first populated when you start stepping through the data set. You will also note that there is no way to signal if a schema item is Required or not. This is schema item option only available if you code your component using Java. However, I have been creative with what I put in the Syntax value and have not missed this feature :)

Once connection and selection are complete then the Connect button is grayed and the Next button becomes available. Each time you press this button it results in a call to getNextEntry() and either returns data or signals EOD.

And now for something cool: Simply open the script editor again and change the If-statement in getNextEntry() to signal EOD after 10 entries instead of 100. Then return to the Input Map tab, press the Close button in the Schema area and then Connect again. This causes the script to be reprocessed and lets you test any changes you made to the code immediately.

Ok, enough theory for now. Let's strip out all the template functions except for selectEntries() and getNextEntry() which we will be rewriting. In addition, we will add the initialize() function as well as some global variables. Here's what the start of the script looks like:

// MyRestConnector
vrs = 0.9; // 20161117 created this component
// main.logmsg() provides info in the Console view in the CE
// You could also write to stdout: java.lang.System.out.println(...)
main.logmsg("MyRestConnector v." + vrs);
// All variables defined outside of function bodies
// are global for the entire script.
// 
// Here is the HTTP Client Connector we'll use to make requests
  // Discovering what the 'internal name' of a Connector is requires a little legwork,
  // and I'll get back to this in a later post.
var http = system.getConnector("ibmdi.HTTPClient");
// Hardcoding the URL for now. Later we'll create a Connection Form
var url = "http://www.ideal-status.nl/static/consumer_notification_advice.json";
// Variables for our NodeList and index
var nodeList = null;
var nodeIndex = 0;
function initialize()
{
// Initialize the HTTP Client CI loaded above
http.initialize(null);
// Reset the data set
nodeList = null;
nodeIndex = 0;
}

We can test the validity of this script by bringing up the Input Map tab again and pressing Connect. If you did not empty out the selectEntries() function then you'll get an error when you try this.

Now we come to the meat of our Connector: selectEntries(). This function does most of the work of component, setting up and making the REST request, parsing the JSON payload received and then preparing the data set to be returned by subsequent calls to getNextEntry(). These three steps are called out in the comments included in the code below:

function selectEntries()
{
// PREPARE REQUEST
// Set up an Entry for passing Output attributes that
// control parameter settings
var requestEntry = system.newEntry();
requestEntry["http.url"] = url;
requestEntry["http.Accept"] = "application/json";
// The HTTP method is GET by default, but just in case...
requestEntry["http.Method"] = "GET";
// Make the request and store the response in a local Entry
// Note that the queryReply() method is what CallReply mode uses
var responseEntry = http.queryReply(requestEntry);
// Check the responseCode returned by the service
var responseCode = responseEntry.getString("http.responseCode");
// If this is not a 2xx return, then throw an exception
if (!responseCode.startsWith("2")) {
var responseMsg = responseEntry.getString("http.responseMsg");
throw "Error making request: " + responseCode 
+ " - " + responseMsg;
}
// PARSE JSON RECEIVED
// Wrapping this in try-catch for better error handling
try {
var json = responseEntry.getString("http.bodyAsString");
// fromJSON() is a static method, so we can call it via the class
var hEntry = com.ibm.di.entry.Entry.fromJSON(json);
} catch (ex) {
throw "Error parsing JSON return: " + ex 
+ "\nJSON: " + json;
}
// PREPARE DATA SET
nodeList = hEntry.getChildNodes();
nodeIndex = 0;

}

Once again we can test that our script so far is correct (at least syntactically) by using the Close and Connect buttons. We are still not seeing any data returned yet because that's the responsibility of getNextEntry() which we code to look like this:

function getNextEntry ()
{
// If the data set is exhausted, setStatus to 0
if (nodeIndex >= nodeList.getLength()) {
result.setStatus (0);
return;
}
// Otherwise, populate the conn Entry via the 'entry' variable
// Borrowing this code from the AL made in the previous blog
// First grab the next node and increment the index
item = nodeList[nodeIndex];
nodeIndex++;
// The 'entry' variable is the conn Entry for this Connector
entry.id = item.getName();
var children = item.getChildNodes(); // get next level
for (var child in children) {
// set conn attribute using child att name and value
entry[child.getName()] = child.getValue();
}
// For completeness sake, I like to set the return status
result.setStatus(1);
}

Once this is in place then we can start testing it using the Close, Connect and Next buttons.

And violá! we have a fully functional Iterator. We can use it in the Feed section of an AL or in a Connector Loop, we can code any of the Iterator mode Hooks, and we can enable Delta if we want to detect changes between each call to the service.

And what's more, if we drop our Connector into an AL then we can step through the script in the AL Debugger.
At this point, we can either double click on ConnectorScript and then set breakpoints in the code, or just start stepping into using the Step into button. Note that pressing Step into while in the script takes debug processing into for- and while-loops, as well as if-statements and try-catch blocks. Step over will do just that: stepping over these code blocks.
As always, the Debugger lets you examine and change variables directly by executing Javascript in the Javascript Commandline located just under the script window.

Each time you press the ENTER key then the script snippet is passed to the running server and run in the context of where the AL processing is at that point. This lets you inspect the state of your component by logging the results of all statements executed, as shown in the screenshot above. Furthermore, you can modify the values of variables and attributes, as well as the contents of Entry objects. You can also define new variables and instantiate new objects, calling scripted functions and invoking Java methods as desired.

I'll keep my love ballad to the AL Debugger short and conclude with the recommendation that you learn to love this time-saving tool.

And I'll wrap up another extended blog here. But I will return to show you how to set up the custom Connection tab for your scripted Connector, so stay tuned!

Wednesday, November 16, 2016

JSON and XML Tutorial - Part 4, JSON example


Practice examples are helpful when mastering new techniques. In this example we'll make a REST request and then handle the return JSON payload. We'll be using the service available at the following URL:

http://www.ideal-status.nl/static/consumer_notification_advice.json

If you dial up this URL you'll get JSON that looks like this:

{"0021":{"issuer_id":"0021","issuer_bic":"RABONL2U","issuer_name":"Rabobank","datetime":"2016-11-21 11:22:49","status":"OK","message":""},"0721":{"issuer_id":"0721","issuer_bic":"INGBNL2A","issuer_name":"ING Bank","datetime":"2016-11-21 11:23:05","status":"OK","message":""},"0031":{"issuer_id":"0031","issuer_bic":"ABNANL2A","issuer_name":"ABN Amro Bank","datetime":"2016-11-21 11:22:51","status":"OK","message":""},"0751":{"issuer_id":"0751","issuer_bic":"SNSBNL2A","issuer_name":"SNS Bank","datetime":"2016-11-21 11:23:07","status":"OK","message":""},"0811":{"issuer_id":"0811","issuer_bic":"BUNQNL2A","issuer_name":"Bunq","datetime":"2016-11-21 11:23:16","status":"OK","message":""},"0771":{"issuer_id":"0771","issuer_bic":"RBRBNL21","issuer_name":"RegioBank","datetime":"2016-11-21 11:23:12","status":"OK","message":""},"0761":{"issuer_id":"0761","issuer_bic":"ASNBNL21","issuer_name":"ASN Bank","datetime":"2016-11-21 11:23:10","status":"OK","message":""},"0091":{"issuer_id":"0091","issuer_bic":"FRBKNL2L","issuer_name":"Friesland Bank","datetime":"2016-11-21 11:22:58","status":"OK","message":""},"0511":{"issuer_id":"0511","issuer_bic":"TRIONL2U","issuer_name":"Triodos Bank","datetime":"2016-11-21 11:23:03","status":"OK","message":""},"0161":{"issuer_id":"0161","issuer_bic":"FVLBNL22","issuer_name":"Van Lanschot Bankiers","datetime":"2016-11-21 11:23:00","status":"OK","message":""},"0801":{"issuer_id":"0801","issuer_bic":"KNABNL2H","issuer_name":"Knab","datetime":"2016-11-21 11:23:14","status":"OK","message":""}}

In JSON terms, this represents a single object with a number of properties, each one with a four digit numeric name (e.g. '0021', '0721', ...). The values of these properties are in turn objects with their own properties like 'issuer_id' and 'issuer_name'. We will look at how to parse this notation into objects that we can leverage in an AssemblyLine.

To do this, create a new AL named jsonxmlTut4 and add the HTTP Client Connector in CallReply mode.

NOTE: CallReply is the most flexible mode for this component, allowing you to dynamically set any and all parameters via specially named attributes in the Output Map. For example, to specify a URL that overrides the parameter setting in the Connection tab, simply map out an attribute named 'http.url'. All parameters can be mapped in this way by prepending the Internal name of the parameter (which you get by pressing the pencil button
 next to a parameter) with the text 'http.'. And now back to the meat of this post...

Paste the URL above into the URL parameter of the Connector and use the 'map everything' wildcard (*) rule in the Input Map. Finally, add the DumpWorkEntry script in order to display what the HTTP Client Connector returns.


When you run the AL then you'll see output similar to this:


The prefix 'http.' is used by the HTTP Parser - which is an important part of the Connector - both for defining the request being sent, as well as for parsing response information. In the Attributes handled by the Parser you can find the standard HTTP headers like Content-Type, Content-Length, responseCode and responseMsg. You will also find special headers like Authorization and cookies (e.g. Set-Cookie). The service called here is also returning the ETag for the queried resource, which is like a fingerprint and/or version number for the resource.

In addition, there are three 'http.' attributes that represent the body of the response:
  • http.body which is the body of the HTTP response, presented according to the Content-Type setting. The above screenshot shows that this value is being returned as a byte array, although for some content types this attribute will have a String value.
  • http.bodyAsBytes always returns the HTTP body as a byte array.
  • http.bodyAsString always returns the HTTP body as a String.
Since we know the payload is a JSON string, we should be able to attach the JSON Parser to our HTTP Client Connector and get back the encoded data.


Now when we hit Run in console the AL, we get both the HTTP content plus a number of additional attributes. And note that even the HTTP content looks different in the log output now.


When reading, Parsers turn byte streams into Entries. Our wildcard (*) Input Map instructs that all attributes created in the conn Entry (the Connector's local cache) are copied into the work Entry. Typically when you see an Attribute displayed in dumpEntry() output it looks something like this:

        "attribute name": "attribute value"

If there are multiple values, then they are shown on separate lines and enclosed with square brackets. In the screenshot above you're seeing quoted attribute names at multiple layers, like "issuer_id" which appears in each of the parsed entities. Even the HTTP attributes appear without the 'http.' prefix and instead look to be contained in an object named 'http'.

This means that the JSON contained hierarchical data, so the Parser parses this into a hierarchical Entry object. Or, as in this case, it takes the flat work Entry holding the HTTP attributes returned by the Input Map of our Connector and adds the tree of parsed data.

Unfortunately, this gives us an Entry holding two types of data which can cause us grief. For example, if we wanted to convert the data to XML format by calling work.toXML() then we'll get an exception due to the mix of hierarchical and non-hierarchical data. For this reason, I never tie a parser to the HTTP Client Connector. Instead, I grab the value of the http.bodyAsString attribute and do the parsing myself:

  json = work.getString("http.bodyAsString");
  hEntry = work.fromJSON(json); // convert JSON to hierarchical Entry

If we replace the contents of the DumpWorkEntry Script with the above snippet then we get a cleaner hierarchical Entry (aka a true hEntry). An hEntry offers a number of handy features, including DOMInterface methods for traversing, searching and editing the tree, like .search(<xpath expressions>).getChildNodes().getElementsByTagName(<tag name>) and .addChildNode(). All these methods are detailed in the TDI JavaDocs for the Entry class. Just look for functions that return Node or NodeList, or that accept these as arguments.

So if we had a payload containing a series of nodes named 'Person' at whatever level in the hierarchy, we could retrieve the list of them like this:

  personList = work.getElementsByTagName("Person");
  for (node in personList) {
      task.logmsg(node.toString());
  }

The NodeList has only two methods: .getLength() and .item(<index>). But as you can see in the above example, TDI's Javascript engine lets you easily for-loop through the Nodes of a NodeList. You can also use square brackets to reference list members: personList[0].

And remember that this works for any hierarchical Entry, like that parsed from JSON or XML, as well as created by custom Parsers and script.

The Nodes returned by methods like .item() are both DOM Nodes and TDI Attributes, so it's wise to study the Javadocs for both. Since there are multiple types of Nodes - like those that represent XML node attributes and those that carry node values - it sometimes takes me a little trial and error to get my script right. And faithful readers will no doubt realize that I do this kind of data exploration either in the AL Debugger or in the Javascript tab at the bottom of the TDI CE.

However, sometimes instead of working with an hEntry, I just stick to Javascript. This means that I convert the JSON payload to a Javascript object and unwrap the data directly.

  json = work.getString("http.bodyAsString");
  jsobj = fromJson(json);
  for (prop in jsobj) { // return the name of each top-level property
      task.logmsg(prop + ": " + jsobj[prop]); // log prop name and value
  }

If I put this code into the DumpWorkEntry Script then the output looks like this:


So we see each of the entities in the JSON as a property with what looks like an identifier followed by '[object object]', which is the TDI JS engine's way of telling us that each value logged was another JS object. If we instead want to display the contents of each item we could either convert each back to JSON representation - toJson(jsobj[prop]) - or we could continue to explore the next level in the data tree. In fact, our logic could check if the value can be logged directly, or should be unwrapped:

  json = work.getString("http.bodyAsString");
  jsobj = fromJson(json);
  for (prop in jsobj) { // return the name of each top-level property
  subobj = jsobj[prop];
  if (typeof subobj == "object") { // explore next level
  task.logmsg(prop + ": ");
  for (subprop in subobj) {
  task.logmsg("  " + subprop + ": " 
+ subobj[subprop]);
  }
       } else {
  task.logmsg(prop + ": " + jsobj[prop]);
  }
  }

This time the output of our AL will look like this:


This is all well and good, we have a handle on the data now and could continue to do all our iterating in script. 

Sometimes however it's easier if we can loop through a data set using AL components. We can do this by scripting an Iterator to use in the built-in loop provided by the Feed section of the AL, or in a Connector Loop component. Or we could use a Conditional Loop and simply step through the entities with script. 

In either case we will want to convert the data into an entry object so that we can use it in Attribute Maps and other AL component features. And I usually leverage a hierarchical Entry when iterating data using components.

Let's start by using a Conditional Loop to do this. First we need to change the code in the DumpWorkEntry Script to this:

  json = work.getString("http.bodyAsString");
  hEntry = work.fromJSON(json);
  items = hEntry.getChildNodes(); // get top level NodeList
  index = 0; // initialize index

Now we can add the Conditional Loop calling it 'more items'. Press the Script button to add this scripted condition:


  return index < items.getLength();


Now we just have to remember to increment our index so we don't loop forever.
Finally, under the Loop we add another Empty Script with the following code:


  item = items[index]; // get next Node
  index++; // increment index

  work.removeAllAttributes(); // empty out work

  // set work attributes from Node values
  work.id = item.getName();
  children = item.getChildNodes(); // get next level
  for (child in children) {
  // set work attribute using child att name and value
       work[child.getName()] = child.getValue();
  }

  task.logmsg(work); // display this Entry

Our AL looks like this now:
And when we run the AL, we see the following output:


Now any components added under the Loop after our Set up work Entry script will have access to the work Entry holding data for a single entity from the parsed JSON payload.

And this post has gotten pretty long already. Look for follow-up post showing how to script a Connector to Iterate through the entities we just handled here.

Monday, November 14, 2016

CouchDB/Cloudant Connector

Those of you who want to learn more about the truly marvellous concept of MapReduce (thanks, Google!) or just want to play with the can't-believe-it's-free CouchDB, here is a connector I wrote a while back that supports both CouchDB and Cloudant. All you need to do is download a free copy of CouchDB (painless install and loads of fun), or sign up for your free Cloudant db in the cloud at https://cloudant.com/sign-up/.

Not only is this component an example of how to script a fully functional Connector to work with a REST service, it also shows how you use the Forms Editor (Open With... in the CE) to create a custom Connection tab - even one that includes javascript to add functionality to the parameter form, like the Query button in this Connector that populates a drop-down with available databases.

And if you run an AL with the component in the Debugger, you can step through and set breakpoints in the Connector Script itself, giving you a bird's eye view of how it actually behaves in action.

This is an as-is component and can absolutely be improved on! Enjoy and let me know if you have questions or make any improvements that you want to share:

             CouchDB/Cloudant Connector - right-click and Save As.
                                                                 Then use File > Import in TDI to create your own
                                                                 CouchDB project. Contains a number of test ALs, although
                                                                 you will need to update parameters for your own DBs.
             Documentation for said component

Enjoy!

Monday, February 22, 2016

JSON and XML Tutorial - Part 3, XML example


Continuing on from Part 1 of this tutorial, let's play a little with XML data using the HEntry techniques discussed.

Here is some example XML that we'll play with:

<teams>
<team name="Stark">
<sigil>Direwolf</sigil>
<member position="pitcher">Robb</member>
<member position="crowsnest">Bran</member>
</team>
<team name="Lannister">
<sigil>Lion</sigil>
<member position="pitcher">Jaime</member>
<member position="bat boy">Lancel</member>
<member position="solar">Kevan</member>
</team>
</teams>

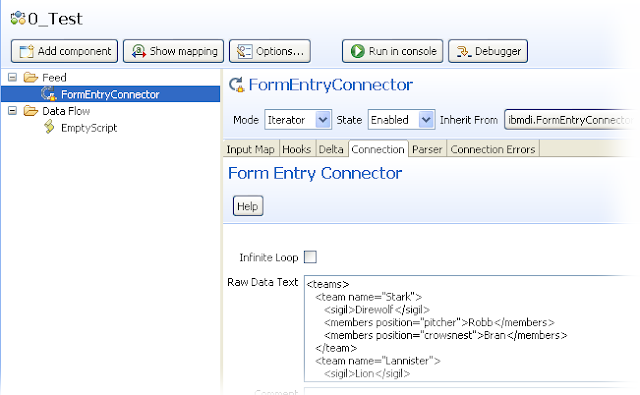
To handle the XML in TDI you could read in a file. A handier approach for play/test is to set up an AL with the FormEntry Connector and paste the encoded string into the Raw Data Text parameter:


FormEntry works like a File Connector, but instead of reading from a file, it uses the data entered into the Raw Data Text parameter.

Add the wildcard map (* map all attributes) to the Input Map and then choose the XML Parser, clearing out the Entry Tag parameter. This tells the parser to return a single Hentry.


From the topmost screenshot you can see that I also dropped an Empty Script in the Data Flow section of my AL. Right click on this empty script and select Run and break here. This launches the AL in the Debugger and runs to this point.

The Watch List (off to the right) shows you that the data is parsed and there are attributes available in the Work Entry. We will ignore this, since it's only part of the truth.

At this point we can start playing with the Hentry. Lets start by accessing the root node of the hierarchical data: teams. Do this by typing work.teams in the Javascript command line and then pressing Enter.  This executes the snippet of script and displays the results in the log output view.


The Debugger first displays the snippet that was executed, followed by >> and then the result. The output above shows this is a TDI Attribute. Attributes display themselves first with their name in quotes followed by a colon (:) and then the value. In the above screenshot the square brackets shown for the value tells us this is a hierarchical Attribute. To get at the children we can use the getChildNodes() method:

    children = work.teams.getChildNodes()
The Debugger tells us that we get a NodeList back (forget the Immutable bit). A NodeList is a standard w3c object that holds a list of nodes: http://docs.oracle.com/javase/6/docs/api/org/w3c/dom/NodeList.html

A NodeList has only two methods: getLength() and item(). The first one tells you how many nodes are in the list, and the second one is for accessing a node. For example:

    for (i = 0; i < children.getLength(); i++) task.logmsg(children.item(i))

This time the output is too long for the log view. So you can press the Page button to view the entire log output in a separate editor.
Note also that instead of using the .item() method, you can also just use square brackets:

    task.logmsg(children[i]);

And furthermore, you can use the for-in construct as well to enumerate child nodes:

    for (child in children) task.logmsg(child.toString());


Wednesday, January 13, 2016

Externalizing an Attribute Map to a file

Hit the More... button at the top of the AttMap - to the right of the Add and Delete buttons - and select Change inheritance. In the resulting dialog click External attribute map and select a file.

The external mapping feature of TDI uses text files that contain one or more mapping rules. Each mapping rule looks like this: name=assignment. Here is an example of a mapping rule:

uid=

This example rule specifies output attribute named 'uid'. The assignment follows the equal sign (=) and is empty in this example. As you can see from Table 1 below, this indicates that the value will come from a similarly named attribute found in the Work Entry. To explicitly specify the source attribute you must write a snippet of Javascript:

uid=work.employeeCode

Now the value written for 'uid' will come from the work Entry attribute named 'employeeCode'.

If more complex script is needed to compute the value for a mapping assignment, you can use square-brackets notation shown in the first table below. This allows you to include multiple lines of Javascript for a single mapping rule.

Table 1: External mapping file syntax
Mapping
Description
sn=
When the assignment is empty then simple mapping is used.

In the example rule shown in the left column, the attribute named 'sn' gets its value(s) from a similarly named attribute in the source Entry. For an Input Map this would be the 'sn' attribute of the conn Entry. For all other map types (Output Maps or Attribute Map components) the source will be the work Entry.
status='Updated'
Anything entered after the equal sign is considered the assignment of the mapping rule. It must be a snippet of Javascript, unless the Text with Substitution flag is used: {S}

In the example rule shown in the left column, the 'status' attribute will get the value specified by the Javascript snippet, resulting in the literal string value Updated
giveName=[
first = work.FirstName
last = work.LastName
return first + " " + last
]
Using square brackets as shown allows the Javascript assignment to stretch over multiple lines.

In the example mapping rule, a full name value is returned by concatenating the FirstName and LastName attributes in the Work Entry.

Flags can also be specified to control the behavior of a mapping rule. These flags must appear in curly braces immediately after the name of the attribute being mapped. Valid flags are: AM and S

The A and M flags correspond to the Add and Mod columns in the Output map of a Connector in Update mode, and control whether this attribute is mapped during Add and Modify operations. 

The S flag denotes that the assignment uses the TDI Text with Substitution feature, which allows for literal text values that can include one or more substitution tokens.

 For example:

uid{A}=work.employeeCode

Now the 'uid' attribute will only included when creating new entries (Add operations).

Table 2: Example mapping rule flags
Mapping
Description
objectClass{A}=
The 'A' and 'M' flags are used to control when this attribute is enabled with regards to the Add and Modify operations of a Connector in Update mode. By default, attributes will be included for both Add and Modify operations unless only one is specified: A or M.

The A flag shown in this example specifies that the 'objectClass' attribute should only be mapped for Add operations.
mail{S}={work.uid}@acme.com
The 'S' flag indicates that the following mapping rule uses Text with Substitution. As a result, any curly braces found will be replaced with the value of the substitution token specified in the braces.

For this example, the value of the uid attribute in the Work Entry is substituted for the token {work.uid} and then the literal string '@acme.com ' is appended to it. The resulting string is returned as the value for 'mail'.

Friday, April 10, 2015

What is the System Store?

The System Store is a database that TDI uses to 'remember' stuff like:

  • the last change read, when you use one of the Change Detection Connectors (also called CDCs);
  • the snapshots of data used to compute changes when using the Delta Engine together with an Iterator Connector;
  • data read using the System Store Connector, which writes and reads full Entry objects with any number of Attributes;
  • objects (of any kind) saved using the system.setPersistenObject() call. These can further be retrieved with system.getPersistenObject(), and removed with system.deletePersistentObject();
  • Sandbox data when you run an AL in Record or Replay modes;
Plus a few other things.

By default, TDI gives you the Derby database system, which is a fully functional open source RDBMS. You can change the System Store used by the TDI server at any time by simply right-clicking on that server in the Servers View and selecting the 'Edit system store settings' option.


This opens up the Server System Store page with its settings. At the top of the page, next to the title, is a drop-down arrow that lets you choose from a list of supported RDBMS's to use as the System Store.


When you select one of these options the various settings below are populated with default values for that system, including all the CREATE statements for standard TDI tables. Only the topmost settings on this page need to be edited to include the actual hostname for your database server,  as well as database name, port used and authentication credentials. Once this has been changed then the new System Store can be tested using the Test Connection button. When TDI is restarted then the server will use the new System Store settings.

Note also that you can define the System Store settings for a Project as well. The Project-specific setting is found in the 'Solution Logging and Settings' item under that Project.


The right-most tab labeled 'System Store' will give you access to the Config Instance System Store settings.

Now whenever an AL in this Config uses the System Store then it will be working with the database system assigned to the Project.

If you use the Browse Server Stores feature to view the contents of the System Store, then the 'last change' information saved by Change Detection Connectors will be easily read in the ID_PS_Default table. This is also where persistent objects that you save in your script is kept.

Each item here will have the key it was saved with - for example, the Iterator State Key value of a CDC, or the key used for a system.setPersistentObject() call - as well as a legible value. However, if you try to access this table using a JDBC or Database Connector then you will see that the value column (called 'Entry' in the table) is a BLOB. This column actually contains serialized Entry objects. If you still want to access this information directly using JDBC then you will have to deserialize the Entry value like this:

     // For example, in the After GetNext Hook you can grab 'Entry' from conn
     // and deserialize it to a new Attribute called 'Value'.
     entryObj = conn.getObject("Entry"); // get the actual Java object value
     conn.Value = com.ibm.di.store.StoreFactory.deserializeObject(entryObj);
     // Now 'Value' can be mapped into Work and is human readable

Finally, it's important to note that System Store settings are stored in the solution.properties file, where you will also find the setting to have the TDI Server automatically launch the Derby RDBMs when it starts up. This property is commented out by default as shown here.

        #com.ibm.di.store.start.mode=automatic

Simply remove the hash mark (#) to make startup automatic. This option is not used when other database systems are selected for the System Store.